
Setting up a ForgeRock Access Manager instance for production may be a cumbersome task as instructions to harden the instance for production may be located all over the documentation.
This post aims to consolidate all the hardening recommendations with more detailed steps and short video guides to achieve them. Ultimately, being the go to reference for how to harden an AM instance.
Note that this post will include some of the recommendations on both ForgeRock documentation and from our own experience. We will be using the latest version of AM as of this post, 6.5.2.3.
If you are here just for the checklist, you can download it by clicking here.
1. Do Not Use /am Or /openam As Deployment Path
IMPORTANCE: BASELINE
Because this is a well-known path for AM, it will be easy for malicious hackers to crawl a domain for it. During installation, rename the war file to a path where it does not seem like ForgeRock AM.
Rename the war file to something that is not obvious.
2. Use Delegated Admin Users Rather Than The Default amadmin Super Admin User
IMPORTANCE: BASELINE
It is insecure to continue to use amadmin user to configure AM as there will not be accountability. This will guide you through the creation of users and groups with privileges similar to amadmin user.
- Create the user if they do not already exist:
Navigate to:Realms > [Realm Name] > Identities, clickAdd Identityand enter details for the user - Create a new group to represent this type of admin user:
Navigate to:Realms > [Realm Name] > Identities > Groups, clickAdd Groupand enter an ID for the group - Add your admin user to this new group:
Navigate to:Realms > [Realm Name] > Identities > Groups > [Group Name]and add the user you selected/created in step 1 as a member - Give this group the required privileges:
Navigate to:Realms > [Realm Name] > Identities > Groups > [Group Name] > Privilegesand enable the required privileges. For full read and write access (including via the REST API), enableRealm Admin - The new admin user now has access according to the privileges assigned to them. If you gave them full read and write access, they have full read and write access to the console
3. Changing The Password Of amadmin To A Strong One
IMPORTANCE: RECOMMENDED
Since amadmin is a default super admin username on all AM instances that can and should not be disabled, it is almost mandatory to set a very strong password.
Although recommended to already have initially set a strong password during initial setup, if you did not, here are the steps to change it later on
- Log in as
amadminuser - Navigate to:
User avatar image (top right of XUI) > Change Password. - Enter your old password
- Enter your desired new password twice
- Click Save to update the password
4. Restrict goto And gotoOnFail URL
IMPORTANCE: BASELINE
By default, AM redirects the user to the URL specified in the goto and gotoOnFail query string parameters supplied to the authentication interface in the login URL likely to aid in development.
To increase security against possible phishing attacks through open redirect, you can specify a list of valid URL resources against which AM validates these URLs. AM only redirects a user if the goto and gotoOnFail URL matches any of the resources specified in this setting. If no setting is present, it is assumed that the goto or gotoOnFail URL is valid.
When setting valid goto URLs, you can use the "*" wildcard, where "*" matches all characters except "?"
4.1. Global level
- Navigate to:
Configure > Global Services > Validation Service - Add the valid goto URL resources to whitelist
4.2. Realm level
- Navigate to:
Realms > [Realm Name] > Services - Add a service
- Select
Validation Service - Add one or more valid goto URLs
- Click Create.
5. Set Higher Maximum File Descriptors And Process Per User To Prevent Denial Of Service
IMPORTANCE: BASELINE
By default, the values set are too low to handle high number of connections by ForgeRock AM, it is required to set this to a higher value (recommendation of 65536)
Assuming a Linux system:
- su to the user where AM is installed under
su - ${AM_USERNAME}
- Change the file descriptor limit to 65536
ulimit -n 65536
- To make this persist across reboots you should run this command to these two lines to /etc/sysctl.conf as root
cat >> /etc/sysctl.conf <<- EOF
fs.file-max=65536
fs.inotify.max_user_watches=524288
EOF
6. Disable The AM API Explorer
IMPORTANCE: OPTIONAL
You may want to disable the API explorer meant to help development to create ambiguity. Especially if it was set to dynamic before.
- Navigate to:
Configure > Global Services > REST APIs - Select
Disabledin theAPI Descriptorsdrop-down list.
7. Disable Module-Based Authentication
IMPORTANCE: BASELINE
Module-based authentication lets users authenticate using specific chain modules with the module=module-name parameter which is only to aid development and must not be enabled in production.
- Navigate to:
Realms > [Realm Name] > Authentication > Settings > Security - Clear the Module Based Authentication check box
8. Lock All Authentication To Resources To Use Specific Authentication Service
IMPORTANCE: BASELINE
By default, AM allows the user to choose their authentication service with the service=service-name parameter, this is also only to aid development and must not be enabled in production. You should set specific authentication tree/chain per realm.
- Navigate to:
Authorization -> Policy Sets -> [Your Policy Set] -> [Your Policy] -> Environments - Click on
Add an Environment Condition - Select
Authentication by Servicefor the type - Key in
/[Realm of Tree]:[Tree Name]to enforce which tree from a realm that the user have to have authenticated against first before being able to access the resource - Ensure all Policy Sets and Policies has this strictly set properly
9. Change Default Cookie Name From iPlanetDirectoryPro
IMPORTANCE: BASELINE
The default settings for cookies has the name set to iPlanetDirectoryPro. If malicious hackers are able to perform Cross-site scripting (XSS) attacks, they can easily look for that specific cookie name to steal the session data.
Assuming you have not set per server settings:
- Navigate to:
Configure -> Server Defaults -> Security -> Cookie -> Cookie Name - Change it to your specified value
10. Enable Unique SSO Token and Secure Cookies
IMPORTANCE: BASELINE
Configuring secure cookies with cookie hijacking protection for CDSSO is recommended, so messages for federated configurations perform signing and encryption as necessary, and AM accesses providers securely (for example using LDAP + StartTLS, or LDAPS to access directory services).
10.1. Enable enableUniqueSSOTokenCookie for cookie hijacking protection
- Navigate to:
Configure -> Server Defaults -> Advanced - Set
com.sun.identity.enableUniqueSSOTokenCookieto true
10.2. Enable Secure Cookies
- Ensure HTTPS is set up correctly as secure cookies only work with HTTPS
- Navigate to:
Configure -> Server Defaults -> Security -> Cookie -> Secure Cookie - Set it to true
11. Configure Specific Cookie Domains
IMPORTANCE: RECOMMENDED
You should also set specific cookie domain fully qualified domain name (FQDN) to the only ones you would access AM with so the cookie cannot be accepted on non-whitelisted domains.
- Navigate to:
Configure -> Global Services -> Platform -> Cookie Domain - Add domains as needed to the text field, press enter on every domain
12. Disable And Restrict Caching Entirely
IMPORTANCE: OPTIONAL
Note that this will cause the XUI to load slower for users as it will be requested from the server everytime.
Global
On the servlet application used, set the headers for all path:
Cache-Control: no-cache, no-store, must-revalidate
Pragma: no-cache
Expires: 0
JSON endpoints
Set Cache-Control: private on all endpoints that contain /json/ in their path on the servlet application except for the following:
/serverinfo/*
/serverinfo/version
/serverinfo/cookieDomains
13. Enable HTTP Strict-Transport-Security (HSTS)
IMPORTANCE: RECOMMENDED
HTTP Strict-Transport-Security header helps to protect websites against man-in-the-middle attacks by enforcing only HTTPS connection
HSTS Policy specifies a period of time during which the user agent should only access the server in a secure fashion. Websites using HSTS often do not accept clear text HTTP.
- Ensure HTTPS is set up correctly
- Uncompress AM WAR file
- Navigate to:
[Uncompressed AM WAR folder] -> WEB-INF -> web.xml - Search for
<!-- filter declaration --> - Add this before that line:
<filter>
    <filter-name>EnableHSTS</filter-name>
    <filter-class>org.forgerock.openam.headers.SetHeadersFilter</filter-class>
    <async-supported>true</async-supported>
    <init-param>
        <param-name>Strict-Transport-Security</param-name>
        <param-value>max-age=31536000; includeSubDomains; preload</param-value>
    </init-param>
</filter>
- Search for
<!-- filter mapping --> - Add this before that line:
<filter-mapping>
    <filter-name>EnableHSTS</filter-name>
    <url-pattern>/*</url-pattern>
</filter-mapping>
- Navigate back to [Uncompressed AM WAR folder] and run
jar -cvf * [Desired name of output WAR file]to compress the folder back to a WAR file - Place the updated WAR file back to the servlet application server deployment folder
14. Set X-Frame-Options To SAMEORIGIN
IMPORTANCE: RECOMMENDED
The X-Frame-Options HTTP response header can be used to indicate whether or not a browser should be allowed to render a page in a <frame>, <iframe>, <embed> or <object>. Sites can use this to avoid click-jacking attacks, by ensuring that their content is not embedded into other sites. Consequently, user-agent not capable of doing TLS will not be able to connect to the site, however this issue is almost non-existent at this point.
- Ensure HTTPS is set up correctly
- Uncompress AM WAR file
- Navigate to:
[Uncompressed AM WAR folder] -> WEB-INF -> web.xml - Search for
<!-- filter declaration --> - Add this before that line:
<filter>
    <filter-name>SetXFrameOptions</filter-name>
    <filter-class>org.forgerock.openam.headers.SetHeadersFilter</filter-class>
    <async-supported>true</async-supported>
    <init-param>
        <param-name>X-Frame-Options</param-name>
        <param-value>sameorigin</param-value>
    </init-param>
</filter>
- Search for
<!-- filter mapping --> - Add this before that line:
<filter-mapping>
    <filter-name>SetXFrameOptions</filter-name>
    <url-pattern>/*</url-pattern>
</filter-mapping>
- Navigate back to [Uncompressed AM WAR folder] and run
jar -cvf * [Desired name of output WAR file]to compress the folder back to a WAR file - Place the updated WAR file back to the web application deployment folder
15. Turn On HTTP-Only Cookies
IMPORTANCE: BASELINE
This will disallow JavaScript to manipulate or retrieve the cookie and will help prevent cross-site scripting (XSS) attacks.
- Navigate to
Configure -> Server Defaults -> Advanced - Set
com.sun.identity.cookie.httponlyproperty value to true. - Save
16. Make Sure HTTPS Connections Are Set Up
IMPORTANCE: BASELINE
This can be done either on the servlet application server or the reverse proxy that points to your AM instance.
Since configuring these is out of this post's scope, we will not be covering it here.
17. Ensure Firewall Is Set Up
IMPORTANCE: BASELINE
Ensure unused ports are properly protected by the firewall. Using a hardware firewall is recommended, but software firewall like UFW and firewall-cmd is also good to have.
You can deploy a reverse proxy within demilitarized zone (DMZ) firewalls to limit exposure of service URLs to the end user as well as block access to back end configuration and user data stores to unauthorized users.
18. Use Reverse Proxy To Proxy AM
IMPORTANCE: BASELINE
After securing the server using a firewall, you could use a whitelist system and only whitelist the reverse proxy to connect with the AM port. This will allow more configuration for requests that comes in. Configuring HTTPS and certificates are easier too.
You have wide range of choices like ForgeRock Identity Gateway, Apache HTTPD, HAProxy, Nginx and many others.
Since configuring these is out of this post's scope, we will not be covering it here.
19. Specify An Appropriate TLS Protocol For Communication With LDAP
IMPORTANCE: RECOMMENDED
It is generally recommended to enforce TLS1.2 for communication.
Between AM and one or more of the following:
- An external AM configuration store
- An external CTS token store
- An external user store
- An Active Directory repository used for AM authentication with the Active Directory module
- An LDAP repository used for AM authentication with the LDAP module
- A repository used for AM certificate authentication with the certificate module
To enforce the TLS protocol for AM connections with LDAP, use the -Dorg.forgerock.openam.ldap.secure.protocol.version JVM setting.
20. Ensure That Authentication Inner Trees Are Unable To Authenticate Users On It's Own
IMPORTANCE: OPTIONAL
If not restricted, users can select the authentication trees they want to use by using the service=service-name parameter. However, if already restricted, this is optional. It is recommended to restrict than just rely on this alone.
Ensure that inner trees do not take in both username and password together will aid to not allow users to use only inner trees to authenticate.
21. Separate Administrative Access From Client Access
IMPORTANCE: BASELINE
Create realms for the organization(s) and separate administrative users from end users.
- Create Realm for organisation
- To direct relevant users to the correct realms in AM you can use either:
- Use the
realm=realm-namequery string parameter - Specify FQDN DNS aliases for the realms
22. Bind To LDAP Using Specific Administrative Accounts Rather Than A Root DN (i.e. CN=Directory Manager)
IMPORTANCE: BASELINE

It is not a good idea to bind using the root DN as essentially the account has read/write privileges on the entire LDAP. You should create specific administrative accounts per different base DN and use those instead. This will be covered in the Directory Services post in the future and set up using profiles.
23. Replace All Test Keys In Keystore With Your Own Keys
IMPORTANCE: BASELINE
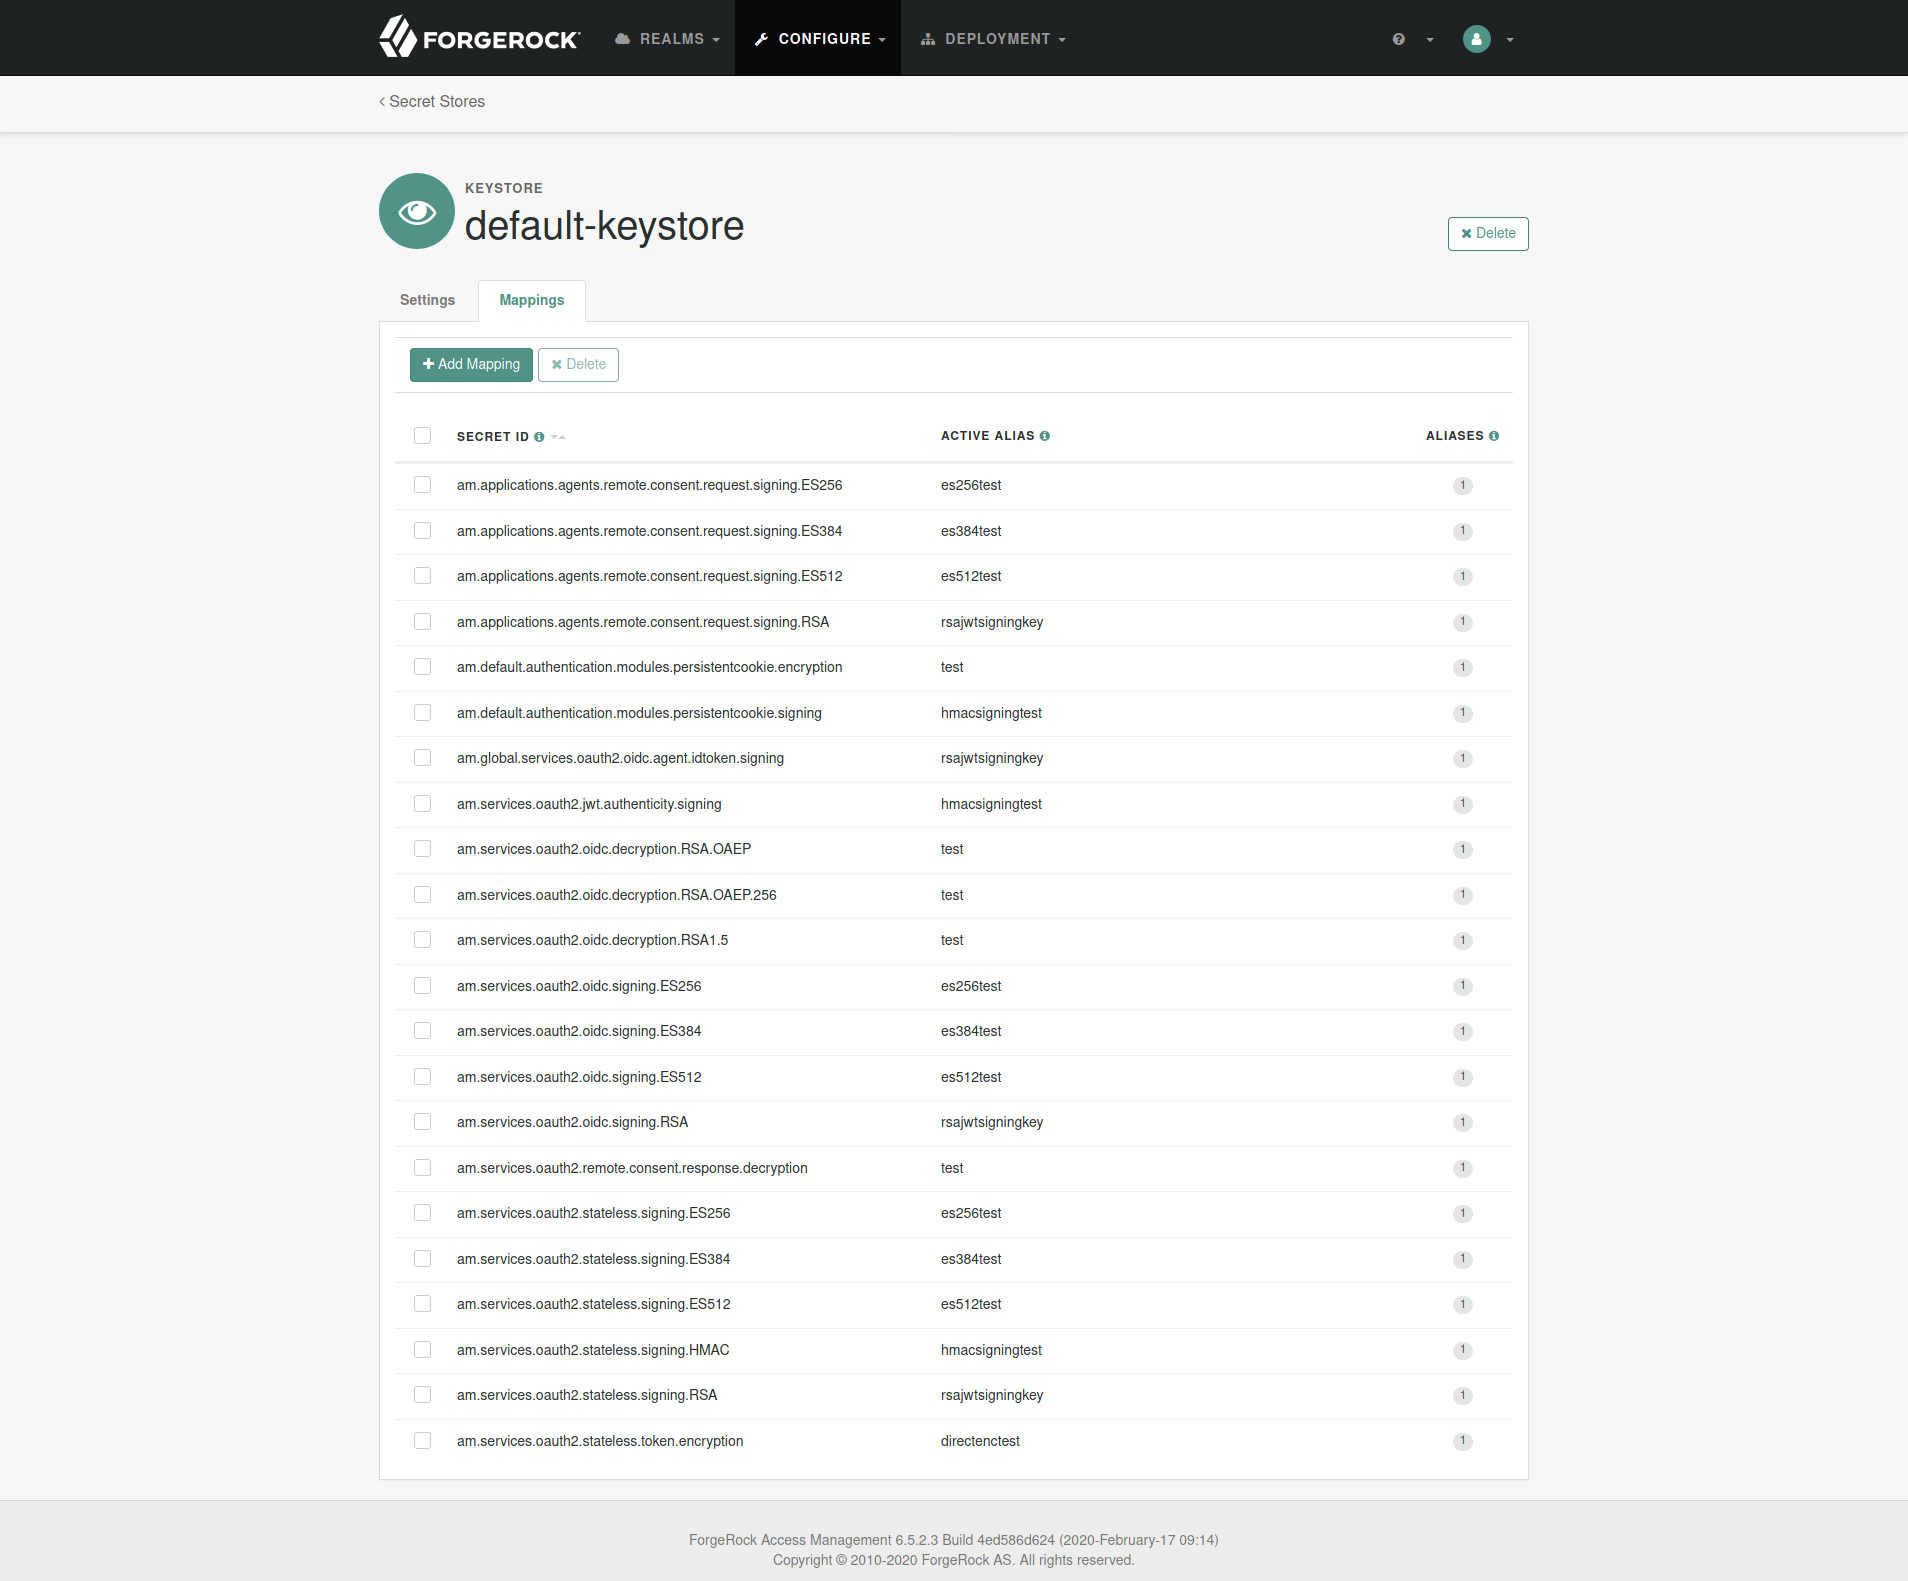
The default keystore that AM uses is located at [AM Config Directory]/openam/keystore.jceks. It includes several test keys that are pre-generated and should not to be used in production.
You should add in your own keys either by a keystore explorer application or keytool CLI and change the reference in AM admin console to point to your key alias.
The store password is a hidden file located at [AM Config Directory]/openam/.storepass which is randomly generated during setup. The password for the keys in the store is always changeit and if changed, you should change it in [AM Config Directory]/openam/.keypass too.
- Navigate to:
Configure -> Secret Stores -> default-keystore -> Mappings - Change all the aliases to your own keys' aliases
Settings That Should Not Be Changed
1. Do not enable allow encoded slash
Ensure the servlet application server configuration do not allow encoded slash in the application URL. It should be disabled by default in Tomcat and JBOSS.
2. Content Security Policy can not be hardened
XUI will break as it relies heavily on in-line scripts. Unless you are planning to use a completely customized UI, this can not be hardened although it helps protects against XSS attacks.
3. Do not disable Cross-Site Request Forgery (CSRF) Protection
AM includes a global filter to harden AM's protection against CSRF attacks. The filter applies to all REST endpoints under json/ and requires that all requests other than GET, HEAD, or OPTIONS include, at least, one of the following headers:
- X-Requested-With This header is often sent by JavaScript frameworks, and the XUI already sends it on all requests.
- Accept-API-Version This header specifies which version of the REST API to use. Use this header in your requests to ensure future changes to the API do not affect your clients.
- Navigate to:
Configure -> Global Services -> REST APIs - Ensure
Enable CSRF Protectionis turned on
The list of hardening recommendations can be non-exhaustive, but we have provided the few most important ones that we have come across.
We have consolidated all of this post into a checklist that you can download, print and use for your own deployments, you can download it by clicking here.
We hope that this post was able to help you determine and perform security hardening on your AM instances more efficiently.
Disclaimer
The document and content made available by Nebulas Tree in no way conveys any right, title, interest or license in any intellectual property rights (including but not limited to patents, copyrights, trade secrets or trademarks) contained herein. Nebulas Tree reserves the right to vary the terms of the document and content in response to changes to the specifications or information made available to Nebulas Tree.
Nebulas Tree does not assume liability for any errors or omissions in the content of this document or any referenced or associated third party document, including, but not limited to, typographical errors, inaccuracies or outdated information. This document and all information within it are provided on an "as is" basis without any warranties of any kind, express or implied. Any communication required or permitted in terms of this document shall be valid and effective only if submitted in writing. Reliance of any information provided herein this document is solely at your own risk.